What is the C wire on a Nest Thermostat? A Comprehensive Guide
Nest thermostats are widely popular for their smart features and energy-saving capabilities. These thermostats allow you to control the temperature of your home from your smartphone or tablet, making it convenient and easy to manage your home's heating and cooling. However, to use a Nest thermostat, you need to have a C wire installed. In this article, we'll discuss What is the C wire on a Nest Thermostat, its importance, and how to install it.
What is the C wire on a Nest Thermostat?
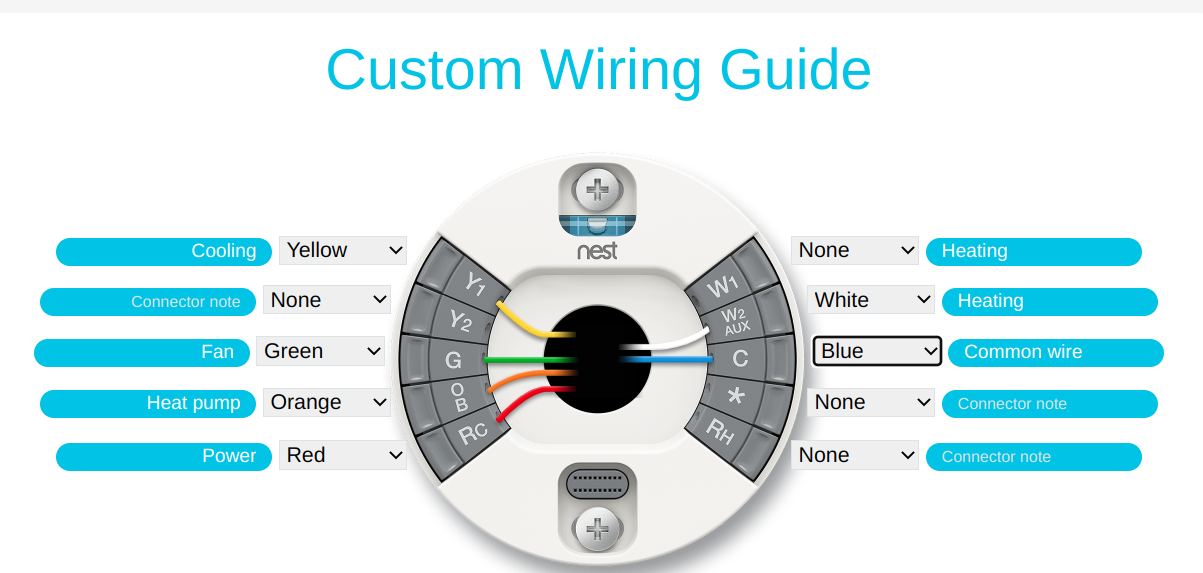
The C wire on a Nest thermostat is a common wire that provides a continuous flow of 24VAC power to your thermostat. The C wire stands for the "common" wire and is essential for Nest thermostats to function correctly. The C wire is used to power the thermostat and keep it charged so that it can communicate with other devices in your home, such as your heating and cooling system.
Why is the C wire important?
The C wire is crucial for the proper functioning of your Nest thermostat. Without it, your thermostat may not work at all or may experience power-related issues. Here are a few reasons why the C wire is important:
-
Power source: The C wire provides a continuous flow of power to your thermostat, ensuring that it is always charged and ready to use.
-
Compatibility: Many modern thermostats, including Nest thermostats, require a C wire for compatibility with your home's heating and cooling system.
-
Stability: The C wire provides a stable power source that prevents power surges and fluctuations that can damage your thermostat and heating and cooling system.
How to install a C wire on a Nest thermostat?
If your current thermostat doesn't have a C wire, you may need to install one before you can use a Nest thermostat. Here's how to install a C wire on a Nest thermostat:
-
Turn off the power: Before you begin, turn off the power to your heating and cooling system to avoid any electrical shock or damage.
-
Locate the wires: Remove the cover from your old thermostat to expose the wires. Locate the wires connected to the Rc, Rh, Y, G, and W terminals.
-
Run a new wire: Run a new wire from your heating and cooling system's control board to your thermostat's location. Use a fish tape or a coat hanger to pull the wire through the walls.
-
Connect the wires: Connect the new C wire to the C terminal on your control board and the C terminal on your Nest thermostat. Connect the remaining wires to their respective terminals.
-
Turn on the power: Once you've connected all the wires, turn on the power to your heating and cooling system.
Frequently Asked Questions (FAQs):
- Q. Do all thermostats need a C wire?
- A. No, not all thermostats require a C wire. However, many modern thermostats, including Nest thermostats, require a C wire for compatibility and proper functioning.
- Q. Can I use a Nest thermostat without a C wire?
- A. Yes, you can use a Nest thermostat without a C wire, but you may experience power-related issues, such as a short battery life or intermittent power.
- Q. How do I know if my thermostat has a C wire?
- A. Check the wiring behind your thermostat. If you see a wire labeled "C," then your thermostat has a C wire.
In conclusion, the C wire on a Nest thermostat is an essential component that provides power to the thermostat and ensures proper functioning. If you don't have a C wire installed, you may need to install one before using a Nest thermostat. The installation process is straightforward and can be done by following the steps mentioned earlier.
If you're not comfortable with installing a C wire or a Nest thermostat, it's always best to seek professional help. YesTechie technicians are trained and experienced in installing smart thermostats, including Nest thermostats. As Nest Pro Installers, they have the knowledge and expertise required to ensure a smooth and hassle-free installation process.
By ordering the Smart Thermostat Installation service from YesTechie technicians, you can rest assured that your Nest thermostat will be installed correctly and efficiently. They'll take care of everything from running the new wire to connecting all the wires to their respective terminals, ensuring that your Nest thermostat is ready to use in no time.
In addition to installation, YesTechie technicians can also provide you with tips and advice on how to get the most out of your Nest thermostat. They'll help you set up the thermostat to optimize energy savings and ensure that it works seamlessly with your heating and cooling system.


